Tuesday, March 28, 2017

Made a boo boo in /etc/environment

Soo, you followed a few links, edited the /etc/environment based on 'accepted solution' against best practices and now you cannot login to the VM.

The boo boo made in the file is causing the login screen to loop regardless of the correct password entered (or another issue depending on the edit you did).

Buck up, let's recovery.

Go to recovery mode:
- Press 'Esc' on bootup ('shift' on some machines)
- Select 'Advanced options for Ubuntu'
 - Select 'recovery mode'
 - Select 'root' to get a terminal with permission
Press control-D to continue
  type: 'mount -o rw,remount /'
The above step makes the file editable which is otherwise read-only
Now use nano or vi to edit the file (undo mistake)
Then issue a 'reboot' command.
Hope this fixes your issue! 

Virtual box share clipboard (copy paste) with host

<pep talk/>
<diagnosis>
So you enabled 'shared clipboard' and 'drag and drop' to bidirectional and it does not work?


<diagnosis/>
<remedy>
Go to 'Devices' > 'Insert Guest Addition CD Image' and follow the steps.
The copy paste should work the next time you restart the VM.
<remedy/>

Monday, June 8, 2015

Error: MongoDB - Hotfix KB2731284 or later update is not installed

If you get the following error, before installing the hot fix I suggest you try something small first.


Try creating the folder structure C:\data\db and run the command again. Worked for me on Windows 7 64-bit. Hot fixes have not usually been tested and may have side effects which is risky specially if you are working on a office laptop.
Also, the default installation makes two folders under program files for Mongo and the server. I find this confusing and not convenient. Skip the default, go with custom and just change the installation path. This is suggested as the default installation not giving the option to change directory as of writing this post.
Once installed just run mongod.exe in the bin folder from a command prompt, you should see the following:

Leave a comment if this helped you.

Cheers,
Malaka

Saturday, June 6, 2015

Running Usergrid - Improved version with a portal that runs on NodeJS

This is a follow up to my earlier post 'Running Usergrid - Get started'. The Usergrid portal now runs on a NodeJS server and that post is somewhat deprecated.

This post assumes you just want to run Usergrid for an evaluation and has the basic steps to get started without having to fork on github to keep up to date with the latest code (that tutorial will follow in my blog hopefully). I don't like lengthy blogs, so here it is short and sweet:

Setup environment for Usergrid: 
Requirements
JDK 1.7: (http://www.oracle.com/technetwork/java/javase/downloads/index.html)
Maven => 3.0  (http://maven.apache.org/): Download and install Maven using the instructions on the Apache Maven website

Download the source from https://github.com/apache/incubator-usergrid
1) Click on 'Download ZIP' and save the code to your machine


Getting started: 

Once you have the source downloaded, navigate to the 'stack' folder and run the following Maven command: 
(you need to have your java path, maven path and maven repository setup for the command to be successful)

A successful build will show 'success' for all the sub-projects as shown below:


This will download the required dependencies to the Maven repository which are needed to build the Usergrid project.
Once that is done, we will go into the launcher folder and run the jar file with the command:


When the jar file is run you will see the following Graphical User Interface (GUI):


'Initialize Database on Start' will create an instance of the Cassendra back-end for you to play around. (Keep in mind however that unlike a proper instance, this stops when you stop the GUI above).


 Go ahead and press the Play button. The light icon will change color from red to orange to green. Green means that the setup was successful. 

Since the launcher is using the command prompt you are using, open up another one for the following steps.
To start your portal instance (navigate to the root>portal folder from the command prompt). As prerequisites you need to:
"
  1. Install Node.js from http://nodejs.org/download/.
  2. From the root directory, run ./build.sh dev.
  3. This will build and run a lightweight server. Naviate to http://localhost:3000
  4. If you have problems, it is often due to having an old version of Node.js installed or a port conflict for port 3000."
(https://github.com/apache/incubator-usergrid/tree/master/portal)

Running step 2 will show an output as shown below:

Wait for the commands to run and when the server is listening on port 300 you should see the following:

You are in business, now browser to: http://localhost:3000/?api_url=http://localhost:8080
You should see the login screen shown below:


The root>stack>rest project readme file has the credentials you can use to login the first time.
Username: superuser
Password: superuser

Once you successfully log in you will be prompted to take the tour. If not, you still have the option at the top of the page.
The tour will explain the different sections of the page. Some screenshots of the tour can be seen below:

Now it doesn't make sense to follow the tour on this blog does it ! get cracking, spin up your very own MBaaS and have fun ! 
If you have any questions, leave a comment and I will see what I can do.
Let me know if this post helped you.
Cheers.

Regards, 
Malaka (Usergrid Contributor)

Saturday, May 17, 2014

Initial clicks on the Usergrid Admin portal

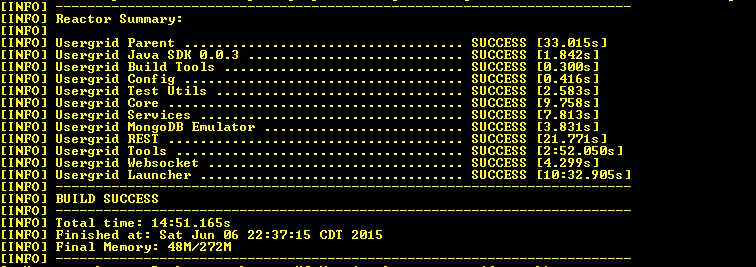
The attempt of this post is to show you some of the areas in the Usergrid admin portal. Mainly to get you going on using Usergrid.
If you still do not have your local instance of "the BaaS framework you run" take a look at my previous post at: http://techviewofalearner.blogspot.com/2014/05/running-usergrid-get-started.html

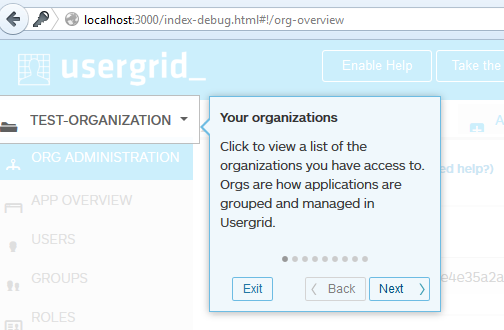
The admin portal at first glance looks like this: 


As you will see, the portal has an Organization and Application set. In this case the Organization is 'test-organization' and the Application is 'test-app'.
I refuse to let you pass this point without an understanding that concept. So I am going to use a few images Sungju Jin (Usergrid commiter) used to explain the internals.

Usergrid supports multi-tenancy by design. The following diagram will give you an idea of what that really means:

Your organization will have many applications, you can think of the application as a sandbox. 
One organization can have many applications and those applications have the following structure:

And when accessing specific data, yeah that is right, go through the organization to your specific application:


Wait a minute, did I just mention 'collection' and 'entity' without explaining what that is ! hmph ! 
Relax, here it is below: 

A collection is basically like a table in sql, we can put items that we model into them (in a non relational DB mindset of course !). Things like 'Users', 'Books', 'Cars', 'Aliens', 'Ghosts' (like the one behind you, don't look back). 
Important thing to note here is that they were always in plural.
An entity is basically like a row in that table, a collection called 'Users' can have the following entity for example:
{

"uuid" : "<ID HERE>", 
"type" : "user",
"username" : "malaka",
"created": 138901448423
"modified" : 138901448423
"activated" : true

}

There you go, that is the basic structure. You have to make sure that is clear, after all the whole point of using a BaaS is not to focus on the back-end implementation. In Usergrid once you have your collections defined (we will see how in a bit) you can do the CRUD (create-read-update-delete) operations on them.
The table below explains how:


if your collection is items, you access it using  https://api.domain.io/my-org-id/my-app-id/items
Doing a GET request to that path gives you all the items available (returns an array of entities - that bulb that went of when you heard the word entities, that is proof you are settling into Usergrid). 
A POST will create a new entity, etc. as shown in the table above.

Now let's do this in Usergrid ! 

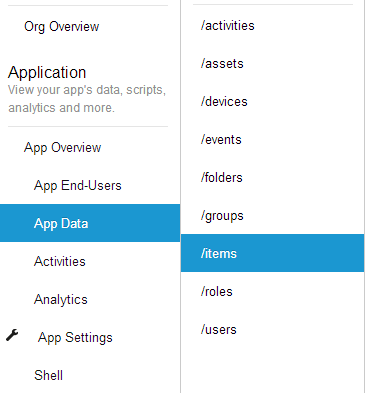
Click on 'App data' and then click on the 'Add collection' button:

Then you will see the following prompt: 


Put the name as 'item' (or anything you want) and press 'create'.  The new collection will show up in the list as you can see below:


As you can see it is now in ... sorry ? ah yeah plural. you are completing my sentences, you are really getting the hang of this. 

Now remember the http GET, POST, PUT etc. above ? So to create a new 'item' I have to do a ?? POST ! exactly. When doing this, we pass the attributes and values in  JSON key-value pairs. As the example below shows the value can be a string like "item 1" or even an int like 123. 


We have been given the option to validate our JSON, so why not use it. Click on 'Validate Json' and make sure your Json is valid. Then click 'run query'. Make sure that POST is selected above. 
This will add your new entity to the items collection. 

You can do a GET on the same to retrieve the item just added: 


To see additional details just click on the 'View Details' and you will see: 


The uuid (unique identifier), created time, modified time and other meta data is already added for you. 
You have now made your first collection and entity on Usergrid ! 


Regards, 
Malaka


More information on: 
Usergrid internals by Sungju Jin (Usergrid commiter) at : https://speakerdeck.com/sungjuly/apache-usergrid-internal

How to contribute to Usergrid by David Johnson (Usergrid commiter) at: http://www.slideshare.net/snoopdave/how-to-contribute-to-apache-usergrid